
Unbox, assemble, and start your first Pilates session in just a few simple steps.
Receiving your new Pilates reformer or tower is always exciting — it marks the beginning of a new journey toward strength, flexibility, and balance. But before you can enjoy your first workout, it’s important to set up your equipment correctly. Whether you’re a studio owner, instructor, or home practitioner, this quick guide will help you install your Pilates equipment safely and efficiently.
At P.E. Pilates, every machine is designed for easy assembly and long-term durability, ensuring you can set it up with minimal effort and maximum confidence.
1. Prepare Your Space
Before opening the box, choose a clean, flat, and spacious area.
- Allow enough room around the equipment for movement and stretching.
- Avoid placing the reformer near walls or sharp edges.
- If you’re setting up in a studio, ensure the floor is even and non-slippery.
A well-prepared space not only makes assembly easier but also ensures safety during future workouts.
2. Unbox Carefully
When unboxing, avoid using sharp tools that could scratch the frame or upholstery.
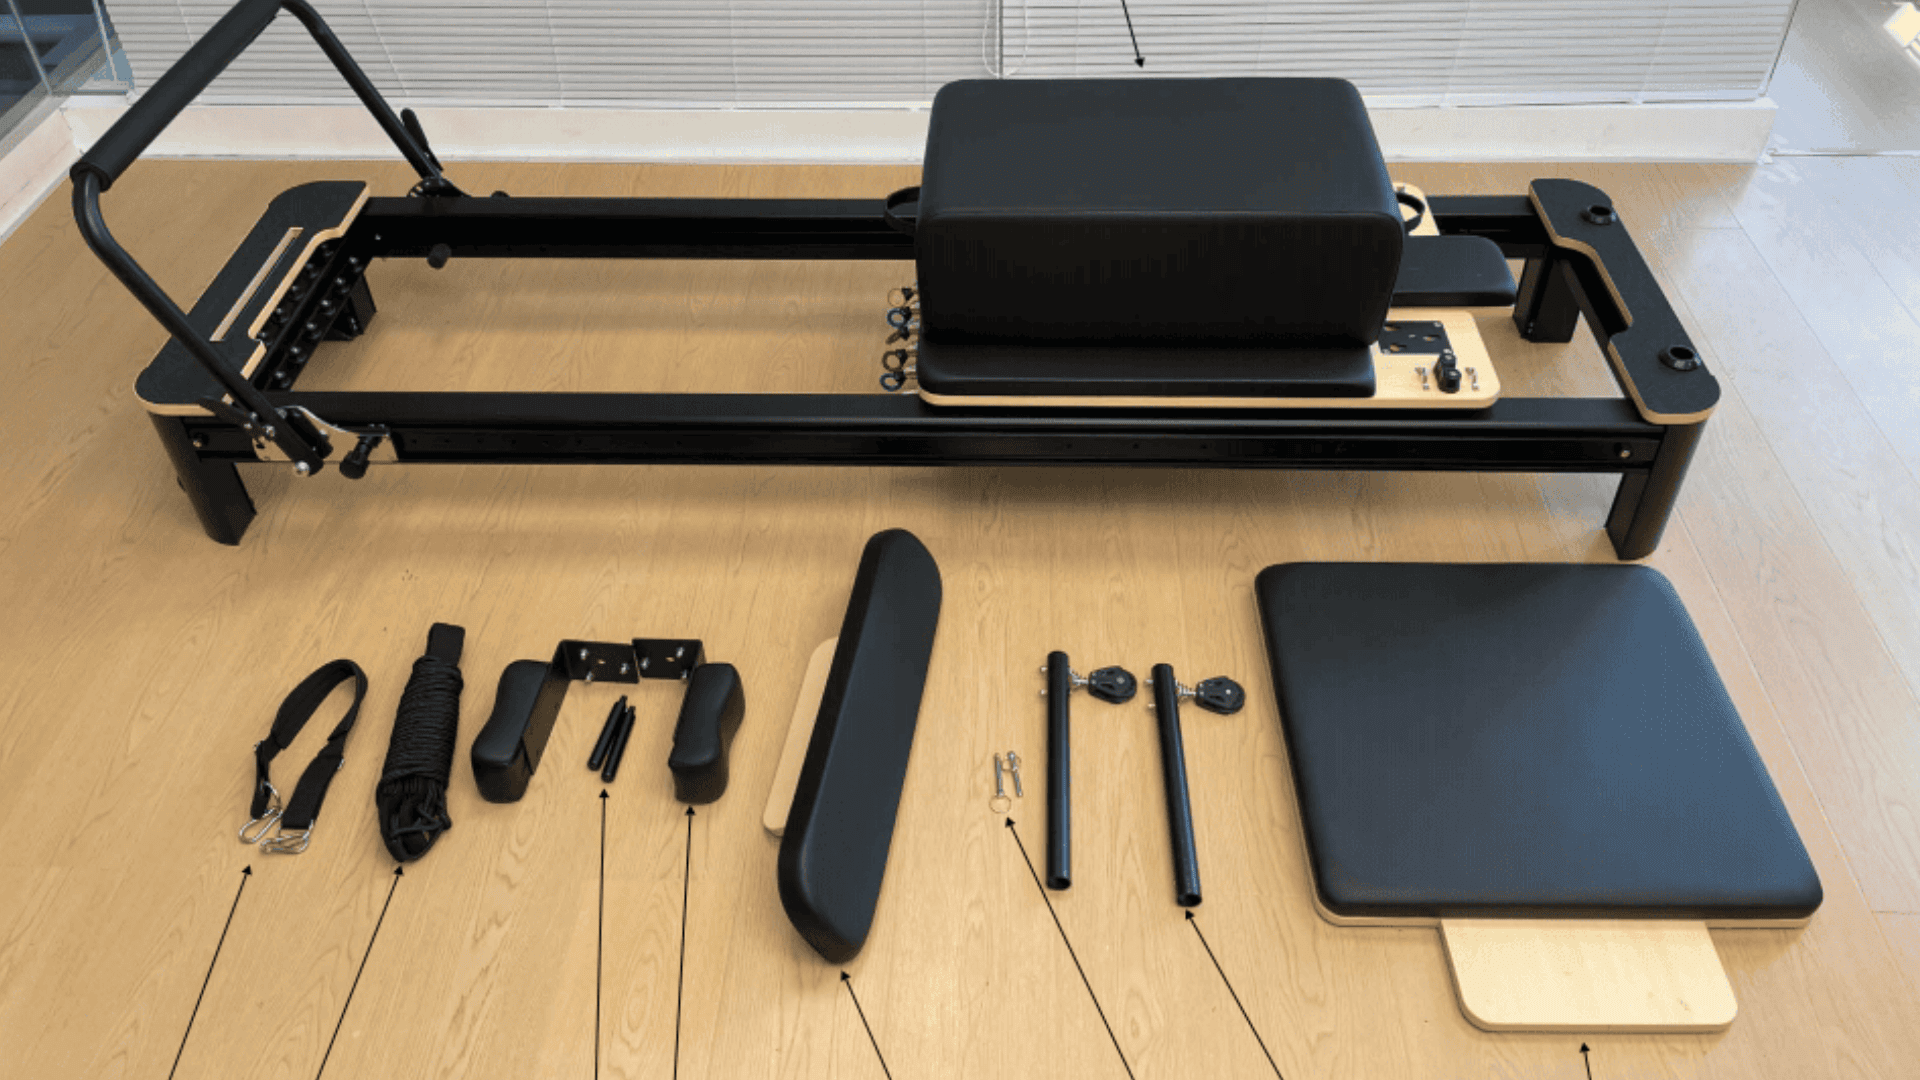
Inside your package, you’ll typically find:
- Main reformer frame
- Carriage and springs
- Footbar and ropes
- Shoulder blocks, headrest, and box (if included)
- Assembly manual and basic tools
Check that all parts are included before starting the installation. If you ordered multiple units for a studio, label each box by model type to streamline setup.
3. Follow the Step-by-Step Assembly Guide
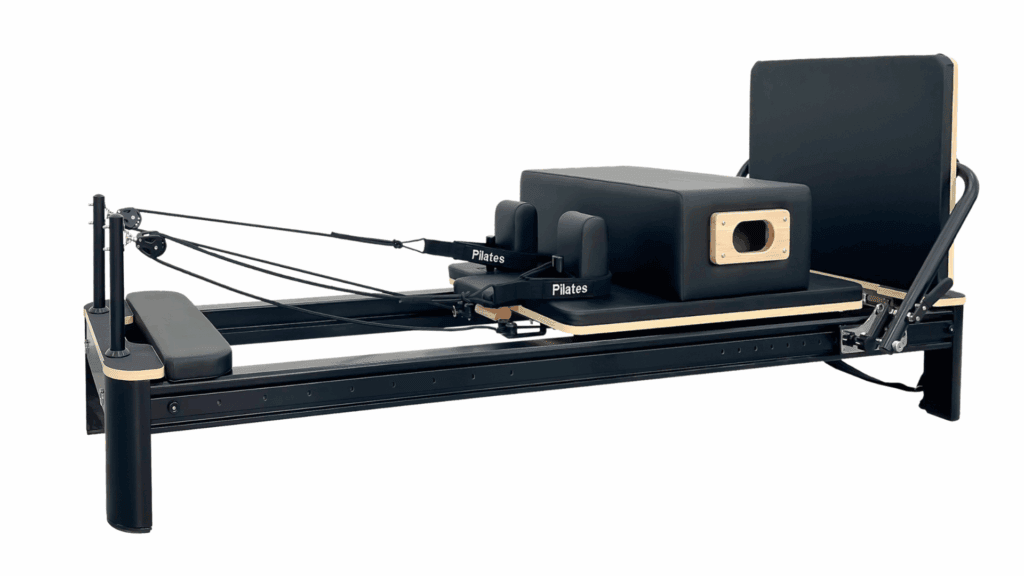
Each P.E. Pilates Pilates Reformer comes with a detailed manual, including visual diagrams for each step.
Here are the AL4 Master Reformer installation steps:
Open the package and check that aII the parts are in order
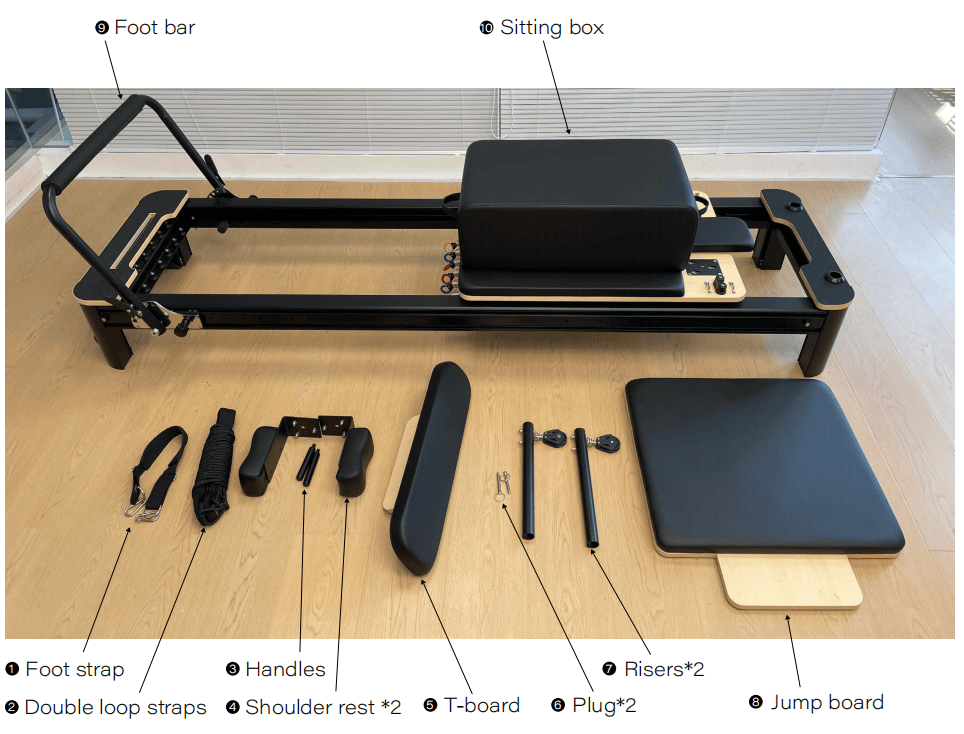
Step 1
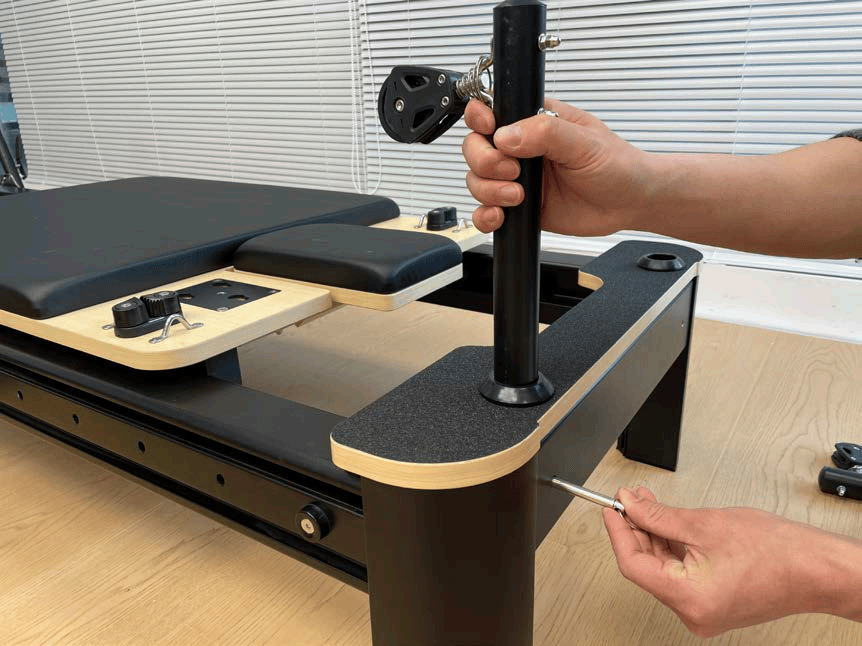
Insert the ❼Risers into the appropriate position and fix it with the ❻PIug
Step 2
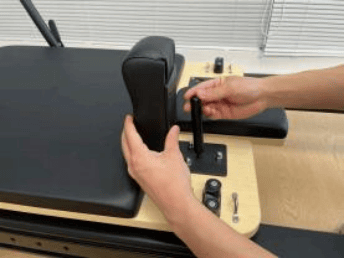
Install two ❹shouIder rest and secure them using ❸handIes and screw
Step 3
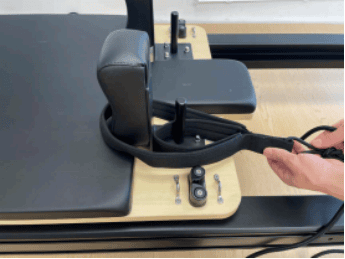
Hang ❷straps on ❹shouIder rest
Step 4
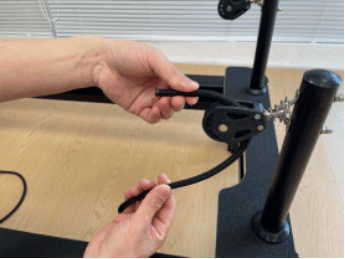
Thread the other end of ❷rope through the pulley
Step 5
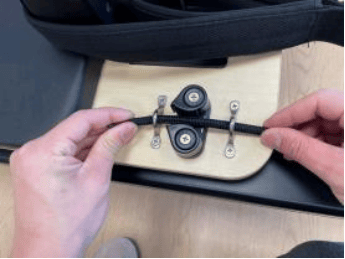
Continue to thread ❷rope end through clamp cleat and holes on carriage
Step 6

Tie a knot at the end of the rope
Step 7
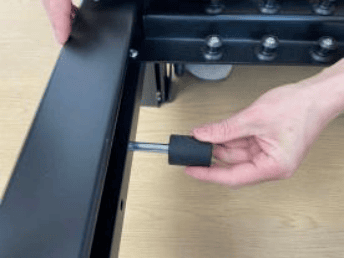
Insert the stopper into the rail
Step 8

Insert ❽Jumpboard
Step 9

Install the ❶foot staps as shown
4. Periodic Maintenance, care & safety checks
Inspect the equipment before first use and after each use to ensure that all accessories are securely fastened.
Also, be sure to have regular maintenance performed by a NovoFit endorsed service technician and keep records of maintenance inspections. Likewise, if any part does not function properly or appears to be loose, have it inspected immediately.
Springs – check for signs of wear, look for deformation, kinks, play and corrosion. springs showing signs of damage must not be used and must be replaced immediately. springs must be replaced every 2 years or 3,ooo hours (whichever comes first) or immediately if they show signs of fatigue or deformation.
Foot Bar – check all allen bolts securing the padded bar to the aluminium arms and to the steel engagement bar and through the frame are tight
Runners – Make sure the rails are cleaned regularly and kept free of dirt as this is the main cause of reformer noise. If e×cessive dirt is found on the rails, the wheels may also need cleaning, we recommend cleaning the runners with window cleaner or isopropyl alcohol cleaner.
Ropes and HandIes – check cords for signs of wear, fraying or scratches and replace if damaged. check the stitching on the handles for intactness and e×cessive wear on the handles.
PVC uphoIstery – Always remove belts, jewellery and shoes when operating the equipment as buckles, rings, watches and bracelets can damage the interior. For cleaning we recommend using gym wipes, window cleaner or isopropyl alcohol cleaner.
WheeIs – Remove the cariage and check for smooth rotation. If the wheel does not turn smoothly or is nicked or damaged, this will prevent the smooth and quiet operation of the equipment and the wheel will need to be replaced.
ShouIder Rests – check the shoulder pads are securely tightened to the main carriage base – if loose retighten.
Spring hooks – hand check that all eyehooks will not move. lf loose remove,apply loctite and retighten. check that the springs are hooked securely & have no bends or abnormal twists.
Nut & AIIen BoIts – check all nuts and bolts are tight, including those on the silent rope pulley wheels and those securing the head rest.
5. TroubIeshooting smooth Running of your Reformer
lf you reformer is not running smoothly and quietly please folow these step in order to getit back up and running smoothly:
A. Check the reformer is level using a spirit level
B. Check the runners and wheels are clean and free from dirt and grit
C. Check the side wheels are correctly adjusted
D. Check the wheels and bearings are not damaged. lf damaged replace
6. Removing the carriage For Maintenance
From time to time you may need to remove the carriage either to deep clean the wheels & runners or to change the springs or wheels. Removing the carriage is easily done and no tools are required. To do this follow these steps
A. Remove shoulder rests, unlocking them first if they were locked
B. Release the ropes from the rope lockers
C. Fold down the rope risers and rotate the pulleys so they are flat and pointing towards the runner
D. Remove the two carriage stoppers at the open end of the runner-these can be unscrewed by hand
E. Now gently slide the carriage out
7. Warranty
This product carries a limited warranty against defects in workmanship and materials for the components and terms listed below:
Frame & Footbar – 1o years (e×cluding any other moving parts attached to the structural frame)
Straps, loops and custom sticky mats – 2 years
Springs – 3 years
Warranty is efective from the invoice date of the original purchase
parts repaired or replaced under the terms of this warranty will be warranted for the remainder of the original warranty period
8. Adjust and Test
Before your first session, double-check that:
The carriage glides smoothly and quietly.
Springs are firmly attached.
The footbar locks securely.
All screws are tightened.
Test the movement by gently pushing and pulling the carriage. If you notice any uneven motion, adjust the wheel alignment or contact WellReformer support for guidance.
9. Safety and Maintenance Tips
Proper setup is just the beginning — regular care keeps your reformer in perfect condition:
Wipe the frame and leather parts after each session.
Avoid exposing it to direct sunlight or humidity.
Lubricate moving parts every 2–3 months.
Check springs and ropes regularly for tension and wear.
With consistent care, your P.E. Pilates equipment will last for many years, maintaining studio-level performance even with heavy use.
10. Need Help? We’re Here for You
Every P.E. Pilates order includes installation videos and online support.
If you’re setting up multiple units for your Pilates studio, our technical team can provide remote or on-site assistance to ensure everything runs smoothly.
👉 Contact us for personalized installation support or to request the latest setup videos.
Start your Pilates journey today — your reformer is ready when you are.


